Are you ready to embark on a delicious journey into the world of sourdough baking? Well, get ready because we’re about to dive into the heart of it all: making your very own sourdough starter. Trust me, there’s something truly special about nurturing a bubbly, tangy concoction of flour and water that will become the secret ingredient to your most mouthwatering bread creations. So, let dust of your apron and get started!
The Wonder of Sourdough Starter
Alright, before we roll up our sleeves and dive into the nitty-gritty of sourdough starter creation, let’s take a moment to appreciate just how amazing this stuff really is. Sourdough starter is like the heart and soul of sourdough bread—it’s what gives it that distinctive tangy flavor and helps it rise to fluffy perfection. But here’s the kicker: it’s made from just two humble ingredients—flour and water—combined with the power of natural fermentation. Yep, that’s right, no fancy additives or preservatives here, just good ol’ fashioned flour and water doing their thing.
Gathering Your Supplies: Flour, Water, and a Little Bit of Love
Now that we’re all on the same page about the awesomeness of sourdough starters, let’s talk about what you’ll need to get started. First up, flour. When it comes to choosing flour for your starter, go for what is easily available to you.
Many say that whole grain flour is the best, myself I prefer bread flour. Back in 2020 during the pandemic, I found I had more time on my hands, so I decided to go on this adventure of making my first sourdough starter “Doughseph”. I tried different flours until I settled on bread flour. It was something I always had on hand. I had the best luck with it in both the making of my bread and the flavor.
I recommend that you find what works best for you. As for water, just make sure it’s non-chlorinated. Chlorine can inhibit fermentation, so it’s best to use filtered or bottled water if you can.
Mixing It Up: Creating Your Starter
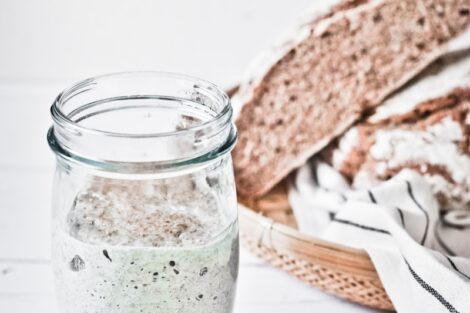
Okay, now for the fun part: making your sourdough starter! This is where the magic happens. Start by mixing equal parts flour and water in a clean glass or plastic container. I like to use a mason jar because it’s easy to see what’s going on inside, but any container will do as long as it’s clean and non-reactive.
Once you’ve got your flour and water mixed together, cover the container loosely with a clean kitchen towel or plastic wrap and let it sit at room temperature.
I find it best to place your jar on a small cookie tray or platter. Trust me from experience when your dough starts fermenting and rising you can have and over flow which can be a mess.
Nurturing Your Sourdough Starter: The Feeding Ritual
Now that you’ve mixed up your flour and water you’re probably wondering what’s next. Well, here comes the fun part: feeding your starter! Just like any living thing, sourdough starter needs to be fed regularly to keep it happy and healthy.
Day 1: Find a clean glass or plastic container to be your starter’s cozy home. Mix 50 grams (about 1/4 cup) of whole grain flour with 50 grams (about 1/4 cup) of water in the container. Stir it well until it’s like a smooth paste. Cover it gently with a clean kitchen towel or loose plastic wrap.
Day 2: It’s like checking in on a friend! Maybe you’ll see some bubbles or maybe not, no worries! Take out half of the mixture (about 50 grams), then add another 50 grams each of flour and water. Give it a good stir, cover it up, and let it rest at room temperature.
Day 3: Keep the friendship growing! You might start noticing some bubbles or a hint of a tangy smell. That’s your starter saying, “Hello!” Same routine: remove half, then add 50 grams of flour and 50 grams of water. Stir it up, cover it, and let it do its thing.
Days 4-7: Your friendship is blossoming! Keep up the routine of taking out half of the starter and feeding it with equal parts flour and water once or twice a day. You’ll see more bubbles, and your starter will be rising and falling like clockwork.
By around day 7, your starter should be lively and fragrant, ready to join you in all your baking adventures!
Signs of Life: Recognizing Starter Activity
Now, I know it can be a little nerve-wracking in the beginning, waiting for your starter to come to life. But trust me, it’s worth the wait! As the days go by, you’ll start to notice some exciting changes happening in your starter.
Firstly, keep an eye out for those telltale bubbles. These tiny pockets of air are a sure sign that your starter is alive and kicking. They’ll start small, like little pinpricks on the surface of your starter, but as time goes on, they’ll grow larger and more abundant, eventually forming a frothy layer of foam.
Bubbles aren’t the only thing to look out for. You’ll also notice your starter starting to rise and fall. This is known as the “hooch,” a layer of liquid that forms on top of the starter as it ferments. Don’t worry, this is perfectly normal! Just give your starter a good stir to incorporate the hooch back into the mixture before feeding it again.
And finally, take a whiff of your starter. Does it have that unmistakable tangy aroma? If so, congratulations, your starter is officially alive and ready to be put to use!
Baking with Your Starter: Let the Magic Begin
Okay, folks, this is where the real fun begins: baking with your sourdough starter! Once your starter is nice and active, you can use it to whip up all sorts of mouthwatering treats.
Let’s start with the classic: sourdough bread. There’s nothing quite like the taste and texture of a freshly baked loaf of sourdough bread, with its crisp crust and chewy interior. And the best part? It’s surprisingly easy to make at home, especially once you’ve got a healthy sourdough starter on hand.
But why stop at bread? Your sourdough starter is a versatile ingredient that can be used in all sorts of recipes, from pancakes and waffles to pizza dough and cinnamon rolls. It adds a subtle tanginess and complexity to baked goods that you just can’t get with store-bought yeast.
But perhaps the most magical thing about baking with sourdough starter is the sense of connection it brings. When you bake with sourdough, you’re tapping into a tradition that stretches back thousands of years, to a time when bread was made simply from flour, water, and wild yeast. It’s a reminder that food is more than just sustenance—it’s a way of connecting with our past and with each other.
Sharing the Joy: Cultivating Community Through Sourdough
Finally, let’s talk about the best part of all: sharing and naming your sourdough creations with the world! There’s something incredibly satisfying about sharing the fruits of your labor with friends, family, and fellow bread enthusiasts. Whether you’re hosting a sourdough baking party or simply sharing a loaf with a neighbor, spreading the joy of homemade bread is what it’s all about. So go ahead, slice off a piece of that warm, freshly baked sourdough bread, slather it with butter, and savor every delicious bite. After all, good bread is meant to be shared!
Making a sourdough start is a labor of love, I hope you take the plunge and create your own and enjoy the wonderful world of sourdough baking as much as I do. So whether you’re a seasoned baker or a complete novice, I encourage you to roll up your sleeves, get your hands dirty, and experience the magic of sourdough for yourself. Happy baking!