Sourdough Bread: Fresh and Delicious

Servings: 12 Total Time: 14 hrs 40 mins Difficulty: Beginner
Transform Simple Ingredients into a Flavorful Artisan Loaf with This Step-by-Step Sourdough Bread Recipe
Sourdough Bread

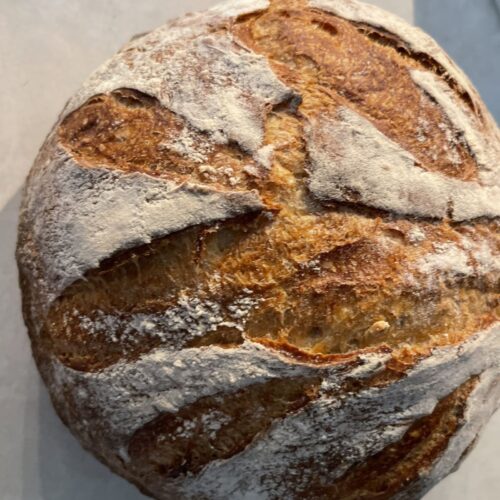
There’s something incredibly satisfying about baking your own sourdough bread. The crispy crust, the chewy crumb, and that unique tangy flavor all come together to create a truly special bread.

What Makes Sourdough Special?

Sourdough bread differs from other bread types because it relies on natural fermentation. Unlike bread made with commercial yeast, sourdough uses a starter – a mixture of flour and water that captures wild yeast and bacteria from the environment. This natural fermentation process gives sourdough its distinct flavor and texture.

Essential Ingredients for Sourdough Bread

One of the most wonderful things about sourdough is its simplicity. You only need a few ingredients, but each one plays a crucial role in the final product.

Flour

The type of flour you use significantly impacts the flavor and texture of your bread. This recipe uses Bread Flour which has a higher protein content that helps develop more gluten, resulting in a chewier texture.

Water

Water is essential for hydrating the flour and activating the yeast and bacteria in your starter. Using clean, filtered water is crucial because chlorine and other chemicals in tap water can inhibit fermentation. The amount of water, or hydration level, also affects the dough’s texture and elasticity.

Sea Salt

Salt enhances the flavor of the bread and helps control the fermentation process. Without salt, your dough could overproof and collapse. Sea salt and kosher salt are great choices for their purity and flavor.

Sourdough Starter

Your starter is the heart of your sourdough bread. You can create a living culture of wild yeast and bacteria at home with flour and water. A healthy starter should be bubbly and have a pleasant, slightly tangy smell.  If you need help getting a starter, please see the link below to start your own sourdough starter.

I remember when I first made my starter. I was skeptical that something so simple could transform into the powerful leavening agent it is. But after a week of daily feeding and watching it bubble to life, I was hooked. It’s like having a little science experiment in your kitchen!

Crafting the Perfect Sourdough Bread

Time and Patience

Sourdough bread isn’t something you can rush. The natural fermentation process requires time and patience. This slow fermentation is what develops the deep flavors and perfect texture.

Fermentation Stages

Understanding the stages of fermentation helps you manage your dough better:

1. Bulk Fermentation: This is the first rise after mixing your dough. It can take anywhere from 4 to 12 hours depending on the temperature and the strength of your starter.

2. Proofing: After shaping your dough, it goes through a second rise. This can take a few hours at room temperature or over

Stretch and Fold Method

The stretch and fold method is a gentler alternative to kneading, helping to develop gluten and build strength in the dough without overworking it. Here’s how to do it:

  1. Rest Period: After mixing the dough, let it rest for about 1 hour. This is known as the autolyse phase, which allows the flour to fully hydrate.
  2. Stretch and Fold: With wet hands, gently lift one side of the dough, stretch it up, and fold it over to the opposite side. Rotate the bowl a quarter turn and repeat the process. Do this four times.
  3. Repeat: Perform the stretch and fold method every 30 minutes for the first 2 hours of bulk fermentation.

I vividly recall the first time I tried the stretch and fold method. Initially, I was skeptical about how such a simple technique could replace vigorous kneading. But as I watched my dough transform with each gentle fold, gaining elasticity and structure, I became a believer. It was a game-changer for my sourdough baking.

Shaping and Scoring

Shaping your dough properly gives it structure and helps it rise upwards instead of spreading out. Scoring, or making cuts on the surface of the dough, allows it to expand in the oven and creates that beautiful crust.

I once skipped the scoring step, thinking it was purely decorative. The loaf expanded unevenly and cracked in all the wrong places. Lesson learned – those pretty designs serve a functional purpose!

Baking Techniques

Baking your bread correctly is the final step to achieving the perfect crust and crumb. Here are a few tips:

Preheat Your Oven: Ensure your oven is fully heated before putting your bread in.

Use a Dutch Oven: Baking in a covered Dutch oven traps steam, which helps create a crispy crust.

Create Steam: If you don’t have a Dutch oven, you can create steam by placing a pan of water in the oven or spritzing the dough with water before baking.

Enhancing Your Sourdough Experience

Troubleshooting Common Issues

Even experienced bakers encounter issues with sourdough. Here are some common problems and solutions:

Flat or Dense Loaves

Underproofing: Your dough might need more time to rise. Try extending the bulk fermentation.

Weak Starter: Ensure your starter is active and bubbly before using it. I like to do the float test, by dropping a spoonful of the active starter in a glass of water, if it floats my starter is ready.  

Overly Sour Flavor

Overproofing: Reduce the fermentation time or refrigerate the dough during the second rise to slow down the process.

Difficulty with Rising

Starter Strength: Make sure your starter is mature and well-fed.

Kneading: Knead the dough enough to develop gluten but not so much that it becomes too tight.

I remember a time when my loaves were flatter than pancakes. After some intense dough interrogation, I realized my kitchen was basically an igloo (ok, maybe not that bad), which was making the dough hibernate instead of rising.

Once I moved it to a cozier spot, it perked up like it had just sipped a hot cup of coffee. Problem solved!

Baking sourdough bread at home is a rewarding experience that combines art, science, and a bit of magic. The process requires time and patience, but the result is a loaf of bread that’s not only delicious but also full of character and flavor.

If you’ve enjoyed this recipe, please subscribe to our blog for more baking tips and recipes or comment below. Happy Baking!

Sourdough Bread: Fresh and Delicious

Easy-to-follow sourdough bread recipe. Using just a few simple ingredients – flour, water, salt, and a lively sourdough starter – you can create a delicious, artisan loaf with a crispy crust and a soft, chewy crumb. Perfect for beginners and seasoned bakers alike.

Prep Time 2 hrs Cook Time 40 mins Total Time 14 hrs 40 mins Difficulty: Beginner Cooking Temp: 475  °F Servings: 12 Best Season: Suitable throughout the year

Ingredients

Instructions

Making Your Sourdough Bread Dough

  1. Ensure your sourdough starter is active and bubbly. You should feed it about 4-6 hours before you plan to mix your dough. I recommend using the float test to check your sourdough starter. Simply fill a glass with water and drop a teaspoon of sourdough starter in the water. If the starter floats, it is ready to use.
  2. In a large mixing bowl, combine the water and starter and mix well, add the flour and salt. Mix until no flour is visible and a shaggy dough has formed. After mixing, let the dough rest for 1 hour.
  3. With wet hands, gently lift one side of the dough, stretch it upwards, and fold it over to the opposite side. Rotate the bowl a quarter turn and repeat the process. Do this four times. Cover the bowl and let it rest for another 30 minutes.
  4. Perform the stretch and fold method every 30 minutes for the next 2 hours. This will be a total of 4 sets of stretch and folds. During this time, you'll notice the dough becoming smoother and more elastic.
  5. After the final stretch and fold, cover the bowl and let the dough rise at room temperature until it has doubled in size. This can take anywhere from 6 to 10 hours, depending on the temperature of your kitchen and the strength of your starter.
  6. Once the dough has doubled in size, gently turn it out onto a lightly floured surface. Shape it into a round or oval loaf by folding the edges into the center, then flip it over and gently shape it with your hands. Place the shaped dough into a proofing basket or a bowl, seam side up. Cover with a cloth or plastic wrap.
  7. Let the dough proof at room temperature for 1-2 hours, or refrigerate it for 12-24 hours for a slower fermentation and deeper flavor. If refrigerating, bake the dough straight from the fridge.
  8. Place a Dutch oven (or heavy pot with a lid) in your oven and preheat to 475°F (245°C) for at least 30 minutes.
  9. Carefully remove the preheated Dutch oven from the oven. Turn the dough out onto a piece of parchment paper or bread sling, seam side down. Using a sharp knife or razor blade, score the top of the dough with a few slashes.
  10. Transfer the dough (with the parchment paper or bread sling) into the Dutch oven. Cover with the lid and place it in the oven. Bake for 20 minutes with the lid on. After 20 minutes check your bread, and continue baking with the cover on until the bread is 190℉ (88℃). I recommend to check my bread every 10 minutes after the first initial 20 minutes.
  11. Once you have reached the internal temperature of 190℉ (88℃), remove the lid and bake for an additional 10-15 minutes, or until the crust is deeply golden and the bread sounds hollow when tapped on the bottom.
  12. Carefully remove the bread from the Dutch oven and let it cool on a wire rack for at least an hour before slicing. This helps set the crust and crumb.
Keywords: Sourdough, Bread, Sourdough Starter, Artisan Bread, Bread Baking, Easy Sourdough Recipe, Natural Yeast

Did you make this recipe?

Share with your family and friends on pinterest.

pinit

Recipe Treasure Chest

Leave a Comment

Your email address will not be published. Required fields are marked *