Are you a fan of raisin bread? It’s such a wonderful baked good that’s loved by many for its amazing aroma, soft texture, and sweet bursts. If you found yourself here you may be like me and enjoy raisin bread any time of day! My homemade raisin bread has a bit of a twist, we’re going to make it using rapid-rise yeast and vanilla. I know what you might be thinking, “Isn’t making bread already time-consuming?” Well, fear not! Rapid-rise yeast is here to save the day, cutting down on those longer rise times and streamlining the whole baking process.
Understanding Rapid Rise Yeast:
So, what exactly is this magical ingredient that promises to speed up our bread-making adventures? Rapid-rise yeast, also known as instant yeast, is a type of yeast that’s been specially formulated to work faster than traditional yeast. Unlike its active yeast, rapid-rise yeast doesn’t require proofing in warm water before being added to the dough. Instead, you can mix it right in with your dry ingredients and watch your dough rise in record time.
Rapid-rise yeast contains a higher percentage of active yeast cells due to its finer granular size, allowing it to ferment more quickly. This means that you can skip the traditional proofing step and go straight to mixing your dough, saving you valuable time in the kitchen. Plus rapid-riseise yeast is incredibly forgiving, making it perfect for beginner bakers who might be intimidated by the bread-making process.
Raisin Bread Ingredients:
Bread Flour:
Serving as the foundational component of our bread dough, bread flour is higher in protein than all-purpose flour. This higher protein content promotes gluten development, resulting in a stronger, more elastic dough structure. The increased gluten formation contributes to better bread volume, improved texture, and enhanced chewiness, making bread flour the preferred choice for yeast-based breads like my raisin bread.
Sugar:
Beyond imparting sweetness to our raisin bread, sugar plays a crucial role in the fermentation process. As yeast feeds on sugars present in the dough, it produces carbon dioxide gas, causing the dough to rise. Additionally, sugar enhances browning during baking, contributing to the attractive golden crust of our bread.
Salt:
While often overlooked, salt serves multiple purposes in bread baking. Not only does it enhance the flavor of the dough by balancing sweetness and acidity, but it also strengthens gluten formation, improving the overall structure and texture of the bread. Additionally, salt regulates yeast activity, preventing excessive fermentation and resulting in a more controlled rise.
Warm Milk:
Milk adds richness and tenderness to our raisin bread. Milk provides additional fat and protein, contributing to a softer crumb and enhancing the overall flavor profile of the bread. When heated, milk proteins undergo denaturation, which improves their functionality in bread dough, resulting in a more tender and uniform texture. This creates a delightful melt-in-your-mouth experience, making each bite of our raisin bread irresistibly soft and moist.
Unsalted Butter:
Adding richness and moisture to our bread, melted unsalted butter contributes to its tender crumb and delicate flavor. Beyond its role in enhancing the texture and mouthfeel of the bread, butter also aids in gluten development and provides a source of fat-soluble flavor compounds, intensifying the overall taste experience.
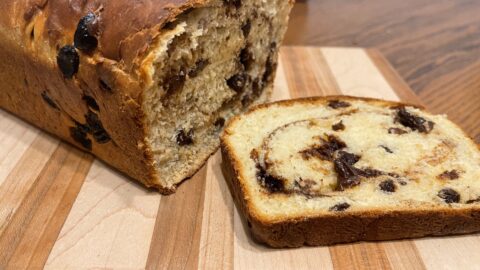
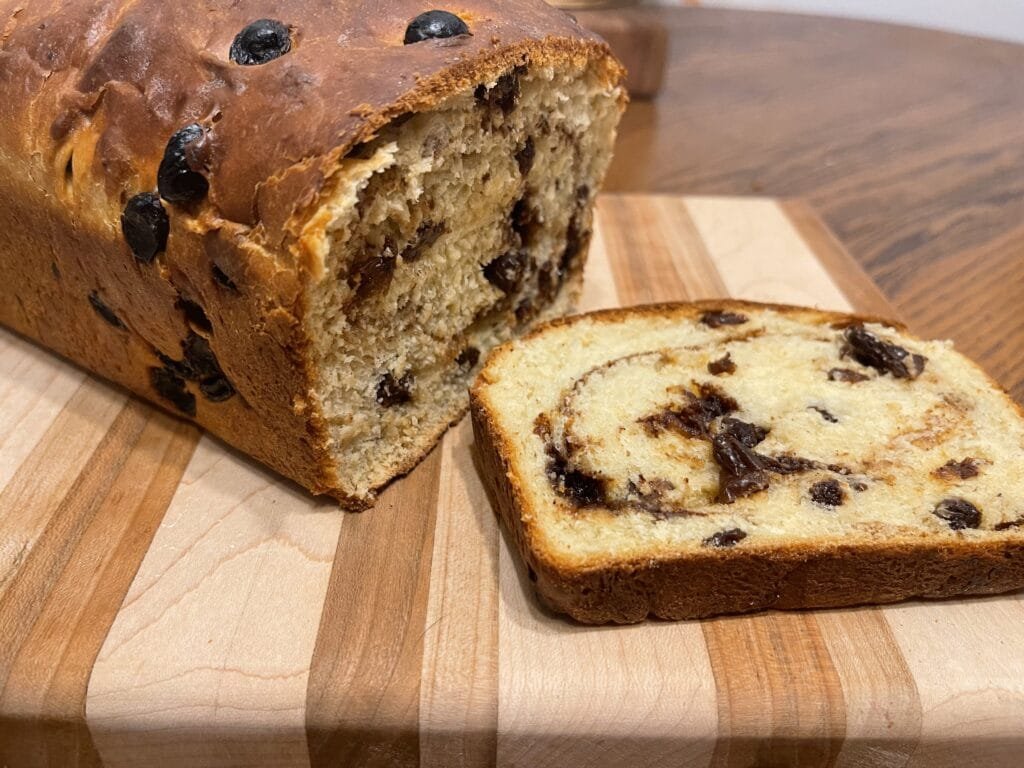
Raisins:
This is where we add another little twist to my Raisin Bread. These little dried grapes impart natural sweetness and bursts of fruity flavor throughout each slice. Beyond their delicious taste, raisins add moisture and texture to the bread, creating pockets of chewiness and contrast amidst the soft crumb. When properly hydrated, as
achieved through soaking in hot water, raisins become plump and juicy, enhancing their succulence and ensuring they remain tender after baking. Once these little raisins are nice and plump, we soak them in vanilla for a little extra flavor. I like to use Thompson raisins but you can also use golden raisins if you prefer.
Step-by-Step Instructions:
Mixing and Proofing:
First things first, let’s get our dough started. In a stand mixer with a dough hook, combine the flour, rapid-rise yeast, sugar, and salt. Make sure that you do not mix the salt and yeast directly together. Adding salt and yeast directly together can hinder the yeast’s fermentation process and affect the overall quality of the bread. Salt slows down or inhibits the yeast’s ability to ferment the dough. This can result in a longer rise time, less volume, and potentially a denser texture in the finished bread.
When yeast comes into direct contact with salt before being fully hydrated in the dough, it can cause the yeast cells to become less active or even die off prematurely. This can lead to inconsistent fermentation, affecting the dough’s ability to rise properly and develop the desired texture and flavor.
To avoid this issue, add the yeast and salt on opposite sides of the dough and give it a good mix. This ensures that the yeast is properly dispersed throughout the dough and has a chance to fully hydrate and activate before coming into contact with the salt. By following this method, you can optimize yeast fermentation, resulting in better rise, texture, and flavor in your homemade bread.
Give everything a good stir to make sure it’s all evenly mixed. Next, pour in the warm milk and butter and knead with the dough hook until a soft dough forms. Knead in the mixer for 8-10 minutes. Now, here’s the best part – instead of waiting around for hours for your dough to rise, with rapid-rise yeast, you’ll only need to let it rest for about 25 minutes. That’s right, folks – we’re talking about instant gratification!
Adding Raisins:
Once your dough has had a chance to rest and puff up a bit, it’s time to add the raisins! Now, you might be tempted to just dump them in and call it a day, but trust me, a little extra effort goes a long way.
I like to take the time to soak my raisins in hot water for 5 minutes, drain, and then let them soak in a teaspoon of vanilla while I make the dough, drain and then add to the dough. This helps to plump them up and infuse them with extra moisture, resulting in plump, juicy raisins with a yummy vanilla twist in every bite of bread. Plus, it adds a subtle sweetness that takes this bread to the next level.
Shaping and Baking:
Once your dough is studded with raisin goodness, it’s time to shape it into loaves. You can go classic with a traditional loaf shape, or get creative and shape it into rolls, twists, or whatever your heart desires. Just make sure to give your bread plenty of room to rise as it bakes – nobody likes a cramped loaf!
Pop your shaped loaves into the oven and let the magic happen. In just about 25-30 minutes, you’ll be rewarded with beautifully golden loaves of raisin bread that smell absolutely heavenly.
Serving and Storing:
Now comes the best part – digging in! Fresh out of the oven, your raisin bread will be warm, soft, and absolutely irresistible. I love to slather mine with a generous pat of butter while it’s still warm, letting it melt into all those nooks and crannies. But feel free to get creative with your toppings – a drizzle of honey, a sprinkle of cinnamon sugar, or even a dollop of cream cheese frosting would all be delicious additions.
As for storing your leftover bread (if you have any leftovers, that is), I recommend wrapping it tightly in plastic wrap or foil and storing it at room temperature for up to a few days. If you want to keep it fresh for longer, you can also freeze it for up to a few months. Just make sure to thaw it out at room temperature before enjoying it again.
And there you have it – homemade raisin bread made easily with rapid-rise yeast! Whether you’re an experienced baker or a novice in the kitchen, this recipe is sure to become a staple in your baking repertoire. So, go ahead and give it a try, and let me know how it turns out. I would love to hear about your experience.