Easy Garlic Bread from Scratch

Servings: 24 Total Time: 3 hrs Difficulty: Beginner
Easy and Delicious Homemade Garlic Bread: A Taste of Comfort in Every Bite!
Garlic Bread

There’s something magical about the aroma of freshly baked garlic bread wafting through the kitchen. The scent of this easy garlic bread can instantly evoke feelings of warmth, comfort, and anticipation.

Whether you’re serving it as a side dish at a family dinner or indulging in it as a late-night snack, garlic bread holds a special place in many people’s hearts (and stomachs).

Why Garlic Bread?

First things first, why garlic bread? Well, if you’re a fan of garlic and bread (and really, who isn’t?), then garlic bread is the perfect marriage of flavors. The pungent aroma of garlic combines with the savory goodness of bread to create a baker’s delight that’s hard to resist. Plus, it’s incredibly versatile – you can serve it alongside pasta, soup, salad, or just enjoy it on its own.

Making French Bread From Scratch

When it comes to making garlic bread, the type of bread you use is crucial. While you can technically use any type of bread, from baguettes to ciabatta, nothing quite beats the flavor and texture of homemade French bread.

Baking your own French bread might sound daunting, but it’s simpler than you think. All you need is flour, water, yeast, olive oil, salt, and a bit of sugar.

The process involves mixing the ingredients, kneading the dough until it’s smooth and elastic, letting it rise, shaping it into loaves, and finally baking until golden brown.

I remember my first attempt at baking French bread vividly. Armed with a simple recipe and a sense of determination, I embarked on the journey of bread-making. As I worked the dough with my hands, I could feel the anticipation building. Would it turn out as delicious as I hoped?

After patiently waiting for the dough to rise and carefully shaping it into loaves, I slid them into the oven and held my breath.  When I finally pulled them out and sliced them, the warm, crusty bread, I knew I had succeeded.

There’s nothing quite like the feeling of accomplishment that comes from baking your own bread from scratch.

The Garlic Butter: A Flavor Explosion

Now, let’s talk garlic butter. This simple yet magical concoction is what gives garlic bread its irresistible flavor. To make it, you’ll need just a few ingredients: butter, garlic, parsley and Italian seasoning.

To begin, start by softening the butter. In case you’re pressed for time, you can divide it into chunks and heat it in the microwave for 7-10 seconds. However, be cautious not to completely melt it.

Following that, finely chop the garlic. If you have a fondness for garlic like I do, you may consider adding an additional clove or two.

Subsequently, finely chop the parsley, if you’re using fresh parsley,, as it will bring a delightful freshness to the garlic butter.

Then, in a medium-sized bowl, combine the softened butter, minced garlic,  parsley and Italian seasoning. Mix thoroughly until all the ingredients are well blended.

For an added burst of flavor, you can incorporate a teaspoon of garlic powder. Lastly, taste the mixture and adjust if needed. Your garlic butter is now prepared for use!

Assembling Your Garlic Bread

Once you have your homemade French bread and garlic butter ready, it’s time to assemble the garlic bread.

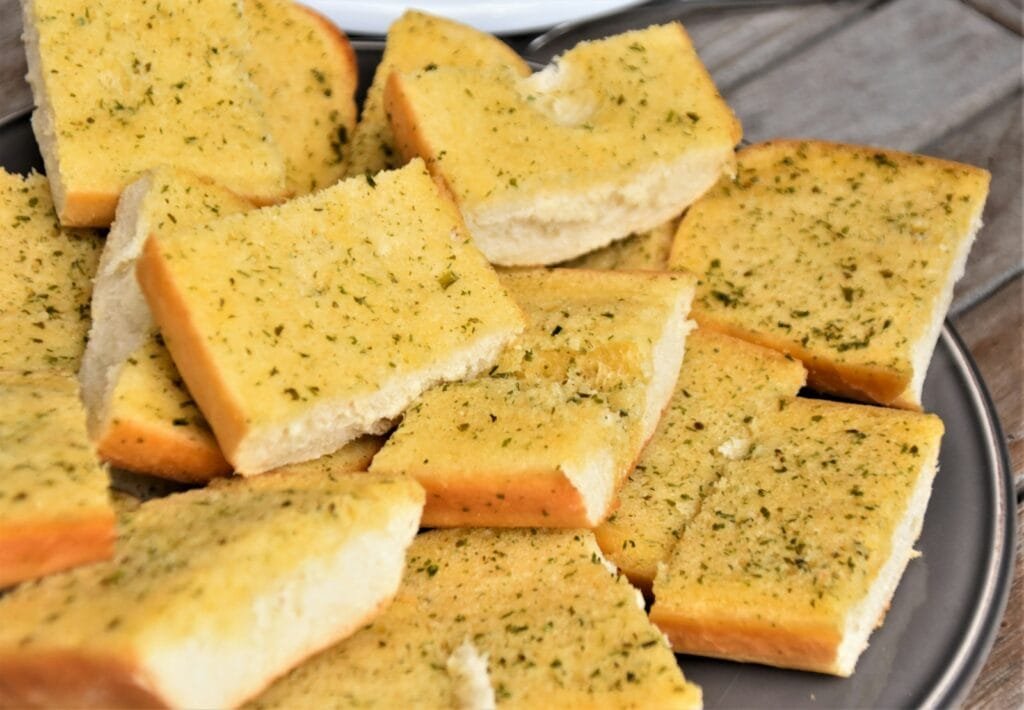
Start by slicing the loaf of bread in half lengthwise, then spread a generous amount of the garlic butter mixture on each half. Make sure to get it to the edges – you want every bite to be bursting with flavor.

When it comes to garlic bread, there’s no such thing as too much butter. Trust me, it’s the key to achieving that perfect golden brown crust and melt-in-your-mouth texture. So don’t be shy – slather it on!

Baking to Perfection: The Final Touch

Once your garlic bread is assembled, it’s time to bake it to perfection. Preheat your oven to 375°F (190°C), then place the bread halves on a baking sheet and pop them in the oven. Bake for 10-15 minutes, or until the bread is golden brown and crispy on the edges.

Now that your garlic bread is hot out of the oven and smelling divine, it’s time to think about how you want to serve it. While it’s delicious on its own, there are plenty of ways to take it to the next level.

For an extra indulgent treat, sprinkle some grated Parmesan or mozzarella cheese on top of the garlic butter before baking. The cheese will melt into the bread, creating a gooey, cheesy crust that’s absolutely irresistible.

Garlic bread made with homemade French bread is a delicious addition to many meals. So the next time you’re craving something comforting and delicious, why not whip up a batch of garlic bread using your own homemade French bread? With its buttery, garlicky goodness and crispy golden crust, it’s sure to satisfy even the most discerning of taste buds. And remember, the journey of baking bread from scratch is just as rewarding as the taste of the final product. Happy Cooking!


Easy Garlic Bread from Scratch

Delight in the savory allure of homemade garlic bread! Crispy, buttery, and bursting with garlic flavor, this easy recipe promises comfort in every bite. Perfect for any meal or snack, it's a culinary delight you'll crave again and again.
Prep Time 20 mins Cook Time 40 mins Total Time 3 hrs Difficulty: Beginner Cooking Temp: 400  F Servings: 24 Best Season: Suitable throughout the year

Ingredients

French Bread Dough:

Garlic Butter

Instructions

French Bread From Scratch

  1. In a large mixing bowl, carefully combine the flour, rapid-rise yeast, sugar, olive oil, and salt, ensuring that the salt and yeast do not come into direct contact to avoid hindering the yeast's fermentation process.
  2. Thoroughly stir the ingredients, then add warm water to create a shaggy dough.
  3. Once the dough has rested, transfer it to a lightly floured surface and knead it for approximately 10 minutes. I recommend using the slap-and-fold kneading method for optimal results with this dough's higher hydration.
  4. Shape the dough into a ball and place it in a lightly oiled bowl. Cover the bowl with plastic wrap and a clean kitchen towel. Allow the dough to rise in a warm dry area for 45-60 minutes, until it has doubled in size.
  5. Gently deflate the risen dough and divide it into two equal portions.
  6. Take each portion and flatten it into a 9x13" rectangle, then tightly roll it up from the long edge, using the palm of your hand to press out any air bubbles. Seal the seams and fold ends in about an inch on each end and seal.
  7. Place the shaped loaves, seam side down, onto a baking sheet lined with parchment paper, ensuring there is adequate space between them.
  8. Loosely cover the shaped loaves with a clean kitchen towel and allow them to rise for another 30-60 minutes, or until they have doubled in size.
  9. While the loaves are rising, preheat your oven to 375°F (190°C). Just before baking, slash the tops of the loaves with a sharp knife or bread lame to allow for expansion, and brush them with an egg wash.
  10. Place the baking sheet in the preheated oven and bake the loaves for about 20-25 minutes, or until they are golden brown and sound hollow when tapped on the bottom of or 190 F (88 C).
  11. Once the loaves are baked, remove them from the oven and let them cool on a wire rack before slicing and serving.

Preparing Garlic Bread

  1. Once bread has cooled, slice french bread in half lengthwise.
  2. In a small bowl, mix together softened butter, minced garlic, dried parsley, italian seasoning, and a pinch of salt until well combined. Spread the garlic butter mixture evenly over the cut sides of the bread.
  3. Place the bread halves on a baking sheet on parchment paper, cut side up. Bake in the preheated oven for 10-15 minutes, or until the edges are golden brown and the bread is crisp.
  4. Remove from the oven and let it cool for a few minutes.
  5. Slice the garlic bread into pieces and serve warm.
Keywords: Homemade, Recipe, Easy, Cheesy, Butter, Toasted, Italian, Breadsticks, Crusty, Quick, Garlic bread with Cheese, Bread with Herbs, Appetizer.
Did you make this recipe?

Share with your family and friends on pinterest.

pinit

Recipe Treasure Chest

Leave a Comment

Your email address will not be published. Required fields are marked *